Hola:
Un amigo se compró el Teensy ++ 2.0. Ahora está ocupado en un empleo nuevo que consiguió y me lo prestó en este mismo momento para hacer pruebas, como Led parpadeante, apagar Led y endenderlo con un pulsador, etc, lo básico. No lo ha probado, sin embargo dice que es C y es fácil. Eso lo voy a comprobar si es tan fácil como dice. Él sabe C, yo no.
Al tenerlo en mis manos, me impresionó lo pequeño que es y su poco peso. Dentro de unas horas pondré capturas desde antes de abrirlo hasta abrirlo por si le pican la curiosidad algunos.
El SoftWare para trabajar con C me sorprendió ya que funciona bajo Windows, Linux e incluso Mac. (Lo mismo para el nuevo MPLAB X).
http://www.arduino.cc/en/Main/SoftwareLo bueno de la Web principal, me llamó la atención sus increíbles tutoriales bien hechos, organizados con imágenes incluidas para empezar con este tipo de prototipo. (Microchip.com debe coger este ejemplo, que espavilen o notarán ventas en AVR de Atmel que PIC de Microchip).
Fue comprado en este enlace:
http://www.pjrc.com/store/teensypp_pins.htmlCon este cable:
http://www.pjrc.com/store/cable_usb_mini_b.htmlEl AVR de Atmel que viene es el:
90USB1286He visto por Internet muy animagos en hacer libros en español sobre AVR. Los de PIC hay libros de sobra y siguen apareciendo, falta por aparecer los PIC32 en español, en Inglés está desde hace tiempo.
Voy hacer pruebas por primera vez desde cero con este dispositivo explicado en la Web haber si es tan fácil al menos de encender y apagat Led partiendo de sus tutotirales.
¿Qué opinan del Teensy ++ 2.0?
Un cordial saludo.
PD: En unas horas subiré fotos sacadas desde un movil.
Edito:
Hola:
Gracias por el apoyo. No se si tiene temporizadores ya que no tengo la menor idea de Atmel, sólo trabajo con PIC. Debe estar en esta hoja de datos de 90USB1286 que puedes ver.
http://www.atmel.com/dyn/resources/prod ... /7593S.pdfLas fotos que he sacado por ahora.
http://www.subeimagenes.com/img/2112201019359-10164.jpghttp://www.subeimagenes.com/img/2112201019360-10165.jpghttp://www.subeimagenes.com/img/2112201019361-10166.jpghttp://www.subeimagenes.com/img/2112201019362-10167.jpgEdito 2:
Ni se cuál es el más sencillo, ahora acaba de avanzar un poco y me volví a atascar.
Buenas:
Por ahora lo que puedo mostrar son capturas de pantalla.

Estoy atascado y no se que hacer a partir de aquí. Recuerdo que no tengo ni la más idea de los AVR de Atmel y me cuesta el Inglés.
Details In The Blinky Source Code
Using avr-gcc with the Teensy USB development board
Compilé el archivo make y me generó el .hex del AT90USB1826.
Parece que hay que seguir con este archivo llamado blicky.c, su código interior es:
/* LED Blink Example with USB Debug Channel for Teensy USB Development Board
 * http://www.pjrc.com/teensy/
 * Copyright (c) 2008, 2010 PJRC.COM, LLC
 *
 * Permission is hereby granted, free of charge, to any person obtaining a copy
 * of this software and associated documentation files (the "Software"), to deal
 * in the Software without restriction, including without limitation the rights
 * to use, copy, modify, merge, publish, distribute, sublicense, and/or sell
 * copies of the Software, and to permit persons to whom the Software is
 * furnished to do so, subject to the following conditions:
 *
 * The above copyright notice and this permission notice shall be included in
 * all copies or substantial portions of the Software.
 *
 * THE SOFTWARE IS PROVIDED "AS IS", WITHOUT WARRANTY OF ANY KIND, EXPRESS OR
 * IMPLIED, INCLUDING BUT NOT LIMITED TO THE WARRANTIES OF MERCHANTABILITY,
 * FITNESS FOR A PARTICULAR PURPOSE AND NONINFRINGEMENT. IN NO EVENT SHALL THE
 * AUTHORS OR COPYRIGHT HOLDERS BE LIABLE FOR ANY CLAIM, DAMAGES OR OTHER
 * LIABILITY, WHETHER IN AN ACTION OF CONTRACT, TORT OR OTHERWISE, ARISING FROM,
 * OUT OF OR IN CONNECTION WITH THE SOFTWARE OR THE USE OR OTHER DEALINGS IN
 * THE SOFTWARE.
 */

#include <avr/io.h>
#include <avr/pgmspace.h>
#include <util/delay.h>
#include "usb_debug_only.h"
#include "print.h"


// Teensy 2.0: LED is active high
#if defined(__AVR_ATmega32U4__) || defined(__AVR_AT90USB1286__)
#define LED_ON        (PORTD |= (1<<6))
#define LED_OFF        (PORTD &= ~(1<<6))

// Teensy 1.0: LED is active low
#else
#define LED_ON    (PORTD &= ~(1<<6))
#define LED_OFF    (PORTD |= (1<<6))
#endif

#define LED_CONFIG    (DDRD |= (1<<6))
#define CPU_PRESCALE(n)    (CLKPR = 0x80, CLKPR = (n))
#define DIT 80        /* unit time for morse code */

void morse_character(char c);
void morse_P(const char *s);
const unsigned char morse_code_table[];


int main(void)
{
    unsigned char i;

    // set for 16 MHz clock, and make sure the LED is off
    CPU_PRESCALE(0);
    LED_CONFIG;
    LED_OFF;

    // initialize the USB, but don't want for the host to
    // configure.  The first several messages sent will be
    // lost because the PC hasn't configured the USB yet,
    // but we care more about blinking than debug messages!
    usb_init();

    // blink morse code messages!
    while (1) {
        for (i=0; i<6; i++) {
            morse_P(PSTR("SOS"));
            _delay_ms(1500);
        }
        morse_P(PSTR("DOES ANYBODY STILL KNOW MORSE CODE?"));
        _delay_ms(4000);
    }
}

// blink a single character in Morse code
void morse_character(char c)
{
    unsigned char code, count;

    if (c == ' ') {
        print("Space\n");
        _delay_ms(DIT * 7);
        return;
    }
    if (c < 'A' || c > 'Z') {
        print("Opps, unsupported character: ");
        pchar(c);
        print("\n");
        return;
    }
    print("Char ");
    pchar(c);
    pchar(':');
    code = pgm_read_byte(morse_code_table + (c - 'A'));
    for (count = code & 0x07; count > 0; count--) {
        LED_ON;
        if (code & 0x80) {
            print(" dah");
            _delay_ms(DIT * 3);
        } else {
            print(" dit");
            _delay_ms(DIT);
        }
        LED_OFF;
        _delay_ms(DIT);
        code = code << 1;
    }
    print("\n");
    _delay_ms(DIT * 2);
}

// blink an entire message in Morse code
// the string must be in flash memory (using PSTR macro)
void morse_P(const char *s)
{
    char c;

    while (1) {
        c = pgm_read_byte(s++);
        if (!c) break;
        morse_character(c);
    }
    print("\n");
}

// lookup table for all 26 letters.  Upper 5 bits are the pulses
// to send (MSB first), and the lower 3 bits are the number of
// bits to send for this letter.
const unsigned char PROGMEM morse_code_table[] = {
    0x40 + 2,    // A: .-
    0x80 + 4,    // B: -...
    0xA0 + 4,    // C: -.-.
    0x80 + 3,    // D: -..
    0x00 + 1,    // E: .
    0x20 + 4,    // F: ..-.
    0xC0 + 3,    // G: --.
    0x00 + 4,    // H: ....
    0x00 + 2,    // I: ..
    0x70 + 4,    // J: .---
    0xA0 + 3,    // K: -.-
    0x40 + 4,    // L: .-..
    0xC0 + 2,    // M: --
    0x80 + 2,    // N: -.
    0xE0 + 3,    // O: ---
    0x60 + 4,    // P: .--.
    0xD0 + 4,    // Q: --.-
    0x40 + 3,    // R: .-.
    0x00 + 3,    // S: ...
    0x80 + 1,    // T: -
    0x20 + 3,    // U: ..-
    0x10 + 4,    // V: ...-
    0x60 + 3,    // W: .--
    0x90 + 4,    // X: -..-
    0xB0 + 4,    // Y: -.--
    0xC0 + 4    // Z: --..
};
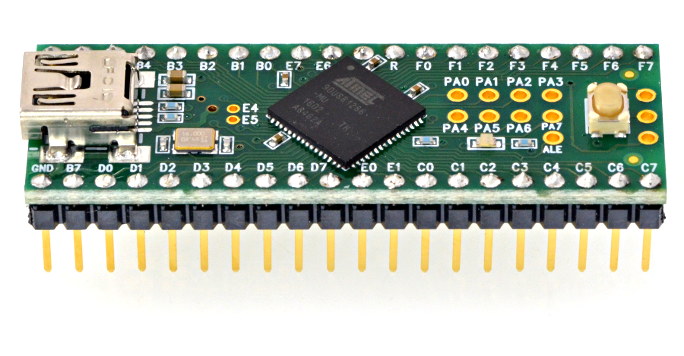
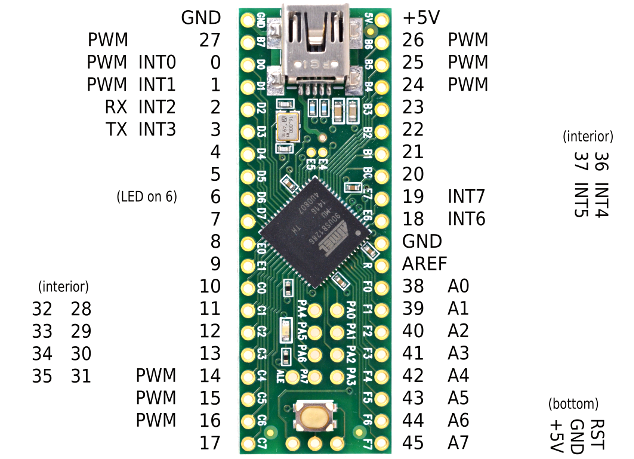
No veo ni rastro de esquema eléctrico para poner un Led. Como no conozco este dispositivo, no me quiero arriesgar a quemar, romper o lo que sea del Teensy y no es mio. Bastante he quemado PIC16F84A y 16F88 como para quemar un AVR sin estrenar, ejjejejeejejej.
Por ahí debe haber algúl esquemita de lo que me está hablando, más que el Inglés me cuestra, capaz que me salté algo.
Subiré más fotos y vídeos del primer Led intermitente.

Parece que ahora falta un toque de acción. Antes ver esquema para conectar los Led y resistencias en sus debidos pines del Teensy ++ 2.0.
Saludo.
Edito 3:
Hola:
Por ahora estoy probando el Teensy ++ 2.0 que es lo unico que tengo. En el futuro habrá un Teensy ++ 3.0, eso no lo dudo. Mi problema ahora es entender este código que puse antes. Parece que hay que configurarlo y que tiene varios. Lo he posido grabar desde ubuntu el .hex.
/* LED Blink Example with USB Debug Channel for Teensy USB Development Board
 * http://www.pjrc.com/teensy/
 * Copyright (c) 2008, 2010 PJRC.COM, LLC
 *
 * Permission is hereby granted, free of charge, to any person obtaining a copy
 * of this software and associated documentation files (the "Software"), to deal
 * in the Software without restriction, including without limitation the rights
 * to use, copy, modify, merge, publish, distribute, sublicense, and/or sell
 * copies of the Software, and to permit persons to whom the Software is
 * furnished to do so, subject to the following conditions:
 *
 * The above copyright notice and this permission notice shall be included in
 * all copies or substantial portions of the Software.
 *
 * THE SOFTWARE IS PROVIDED "AS IS", WITHOUT WARRANTY OF ANY KIND, EXPRESS OR
 * IMPLIED, INCLUDING BUT NOT LIMITED TO THE WARRANTIES OF MERCHANTABILITY,
 * FITNESS FOR A PARTICULAR PURPOSE AND NONINFRINGEMENT. IN NO EVENT SHALL THE
 * AUTHORS OR COPYRIGHT HOLDERS BE LIABLE FOR ANY CLAIM, DAMAGES OR OTHER
 * LIABILITY, WHETHER IN AN ACTION OF CONTRACT, TORT OR OTHERWISE, ARISING FROM,
 * OUT OF OR IN CONNECTION WITH THE SOFTWARE OR THE USE OR OTHER DEALINGS IN
 * THE SOFTWARE.
 */

#include <avr/io.h>
#include <avr/pgmspace.h>
#include <util/delay.h>
#include "usb_debug_only.h"
#include "print.h"


// Teensy 2.0: LED is active high
#if defined(__AVR_ATmega32U4__) || defined(__AVR_AT90USB1286__)
#define LED_ON        (PORTD |= (1<<6))
#define LED_OFF        (PORTD &= ~(1<<6))

// Teensy 1.0: LED is active low
#else
#define LED_ON    (PORTD &= ~(1<<6))
#define LED_OFF    (PORTD |= (1<<6))
#endif

#define LED_CONFIG    (DDRD |= (1<<6))
#define CPU_PRESCALE(n)    (CLKPR = 0x80, CLKPR = (n))
#define DIT 80        /* unit time for morse code */

void morse_character(char c);
void morse_P(const char *s);
const unsigned char morse_code_table[];


int main(void)
{
    unsigned char i;

    // set for 16 MHz clock, and make sure the LED is off
    CPU_PRESCALE(0);
    LED_CONFIG;
    LED_OFF;

    // initialize the USB, but don't want for the host to
    // configure.  The first several messages sent will be
    // lost because the PC hasn't configured the USB yet,
    // but we care more about blinking than debug messages!
    usb_init();

    // blink morse code messages!
    while (1) {
        for (i=0; i<6; i++) {
            morse_P(PSTR("SOS"));
            _delay_ms(1500);
        }
        morse_P(PSTR("DOES ANYBODY STILL KNOW MORSE CODE?"));
        _delay_ms(4000);
    }
}

// blink a single character in Morse code
void morse_character(char c)
{
    unsigned char code, count;

    if (c == ' ') {
        print("Space\n");
        _delay_ms(DIT * 7);
        return;
    }
    if (c < 'A' || c > 'Z') {
        print("Opps, unsupported character: ");
        pchar(c);
        print("\n");
        return;
    }
    print("Char ");
    pchar(c);
    pchar(':');
    code = pgm_read_byte(morse_code_table + (c - 'A'));
    for (count = code & 0x07; count > 0; count--) {
        LED_ON;
        if (code & 0x80) {
            print(" dah");
            _delay_ms(DIT * 3);
        } else {
            print(" dit");
            _delay_ms(DIT);
        }
        LED_OFF;
        _delay_ms(DIT);
        code = code << 1;
    }
    print("\n");
    _delay_ms(DIT * 2);
}

// blink an entire message in Morse code
// the string must be in flash memory (using PSTR macro)
void morse_P(const char *s)
{
    char c;

    while (1) {
        c = pgm_read_byte(s++);
        if (!c) break;
        morse_character(c);
    }
    print("\n");
}

// lookup table for all 26 letters.  Upper 5 bits are the pulses
// to send (MSB first), and the lower 3 bits are the number of
// bits to send for this letter.
const unsigned char PROGMEM morse_code_table[] = {
    0x40 + 2,    // A: .-
    0x80 + 4,    // B: -...
    0xA0 + 4,    // C: -.-.
    0x80 + 3,    // D: -..
    0x00 + 1,    // E: .
    0x20 + 4,    // F: ..-.
    0xC0 + 3,    // G: --.
    0x00 + 4,    // H: ....
    0x00 + 2,    // I: ..
    0x70 + 4,    // J: .---
    0xA0 + 3,    // K: -.-
    0x40 + 4,    // L: .-..
    0xC0 + 2,    // M: --
    0x80 + 2,    // N: -.
    0xE0 + 3,    // O: ---
    0x60 + 4,    // P: .--.
    0xD0 + 4,    // Q: --.-
    0x40 + 3,    // R: .-.
    0x00 + 3,    // S: ...
    0x80 + 1,    // T: -
    0x20 + 3,    // U: ..-
    0x10 + 4,    // V: ...-
    0x60 + 3,    // W: .--
    0x90 + 4,    // X: -..-
    0xB0 + 4,    // Y: -.--
    0xC0 + 4    // Z: --..
};
1) Quiero un código de ejemplo de parpadeo de Led.
2) He conseguido grabar el .hex con el código de arriba.
3) Un esquema eléctrico de una resistencia y un Led. Quiero saber el patillaje donde hay que conectarlo al menos.
4) Sospecho que el código de arriba hay que modificarlo y so varios programas en uno me da la impresión.
Saludo.


